最近在了解OTA升级方面的东西,学习的过程中,对Android的启动流程产生了很大的兴趣,很好奇为什么调用了RecoverySystem#installPackage方法之后手机重启就自动进入升级界面开始升级?Android整个系统的启动流程到底是怎样的。加上之前对bootloader、recovery等概念比较模糊,于是打算把这些东西梳理一下。
Android手机正常启动流程
首先需要梳理一下Android手机正常启动的整个流程是怎样的,也就是当我们按下电源键一直到看到Launcher中间经历了什么!整个过程会从简表述,抛开其中很多不重要的细节。
首先,操作系统的启动是一个比较矛盾的过程:必须先运行程序,然后计算机才能启动,但是计算机不启动就无法运行程序! 早期采取的措施就是:将一小段程序固化在ROM中,计算机启动时,先去将它读入到内存中执行,进而将整个操作系统运行起来。在Windows上这段程序称之为BIOS(基本输入输出系统),对应的在Android中我们称之为BootLoader。
Android电源键按下时,首先从ROM的固定位置读取这段BootLoader程序(加载到RAM中)。BootLoader完成的工作大致有:
初始化RAM、硬件,加载内核,跳转到内核中由其继续完成接下来的工作。
在内核模块中,主要进行大部分硬件、驱动、文件系统的初始化,在最后创建init进程,这是Android中的第一个进程! init进程中会执行init.rc脚本,其中最特别是创建了Zygote受精卵进程。在Zygote进程会预先加载App需要的一些资源和Android的framework class,之后其他App进程的创建都是直接fork Zygote进程,它们共用这些资源,节省开销!(像Xposed框架就是在Zygote进程中插入hook代码,这样所有应用调用到framework api,都会执行到它的逻辑,因为共用了相同的内存资源)
有一个例外是,SystemServer进程不是fork Zygote而来,SystemServer中完成了大量系统服务的启动,比如我们经常接触到的WindowMangerService、ActivityManagerService、PackageManagerService等等。在ActivityManagerServie启动之后,发出action为Intent.CATEGORY_HOME的intent,启动Launcher应用,至此Andorid系统启动完毕!
正常启动的流程是不是非常简单,最后来总结一下:
按下电源键 —> cpu加载BootLoader到内存中执行 —> 初始化硬件、进入内核模块 —> 内核模块中加载驱动、文件系统、创建第一个进程Zygote —> 创建一些系列的SystemServer,发送Home Intent —> Launcher启动
Recovery模式(卡刷)
刷过机的同学可能都知道Recovery这个东西,一般是通过长按组合键(不同手机不同组合键)进入Recovery然后安装升级包之类的。那Recovery到底是个什么东东呢,怎么进入到Recovery模式中的。
其实Recovery模式也是一个小的操作系统,只不过我们看到的只是一个小小的简单界面,而正常的Android系统是可以看到Launcher应用和各种其他应用。有点类似于windows上的U盘启动盘用来修复、更新主系统的。
那Recovery模式是怎么进去的呢?
上面讲过正常的流程中,BootLoader程序会初始化RAM、硬件,然后加载内核。如果我们在BootLoader启动的时候按下了对应的组合按键(比如音量-和电源键),BootLoader检测到之后同样会加载内核,但是此时加载的不是boot分区的内核,而是recovery分区的内核,在recovery分区的内核中初始化了一个简单的文件系统可供我们选择升级包进行升级。同时也会创建init进程执行自己的init脚本(源码bootable/recovery/etc/init.rc),其中做了一件非常重要的事情,启动recovery服务(源码bootable/recovery/recovery.cpp),这个服务稍后会讲解一下做了什么事情。
除了长按组合键这种进入Recovery模式的方式,还可以执行adb命令 adb shell reboot recovery,重启后进入Recovery模式。这种方式是怎么进入Recovery模式的呢?
当BootLoader在执行过程中没有检测到任何组合按键,就会去MISC分区的启动控制信息块BCB(Bootloader Control Block)。BCB是一个结构体,存放着启动命令,根据这个命令,系统可以进入三种不同的启动模式
[@BCB结构体]
struct bootloader_message{
     char command[32];  //存放不同的启动命令

     char status[32];   //update-radio或update-hboot完成存放执行结果

     char recovery[1024]; //存放在/cache/recovery/command中的命令
};
当结构体中command为空时,进入正常的系统启动流程。
当结构体中command字段为"boot-recovery"时,则进入Recovery模式,进行下一步的功能。
所以,执行adb命令进入就是将"boot-recovery"这个字段写入了BCB的command字段中,然后重启系统。
同样,在安装OTA升级包的时候通常会调用一个这样的接口RecoverySystem#installPackage,然后就会重启进入到升级页面。其实,在调用了这个接口之后,会将"boot-recovery"写入BCB的command字段, 然后重启设备。 这样,设备重启之后,读取到BCB的command跳转到Recovery中启动Recovery服务进行OTA包升级。
总结:
- Recovery模式是一个mini的操作系统,主要启动自己的Recovery服务搞一些事情(具体下面细说)。
- 进入Recovery模式有三种方式:长按组合键、adb reboot recovery、RecoverySystem#installPackage等API接口。 第一种方式是BootLoader执行过程中检测的。 后两种方式原理相同,都是修改BCB的内容,然后BootLoader读取跳转。
Recovery服务的细节
上面介绍了进入Recovery的大概流程,提到了一个Recovery的服务,Recovery能提供的功能基本都在这个服务中定义,可以从源码的注释中可以详细了解到Recovery提供的全部服务:
[@bootable/recovery/recovery.cpp]
/*
 * The recovery tool communicates with the main system through /cache files.
 *   /cache/recovery/command - INPUT - command line for tool, one arg per line
 *   /cache/recovery/log - OUTPUT - combined log file from recovery run(s)
 *   /cache/recovery/intent - OUTPUT - intent that was passed in
 *
 * The arguments which may be supplied in the recovery.command file:
 *   --send_intent=anystring - write the text out to recovery.intent
 *   --update_package=path - verify install an OTA package file
 *   --wipe_data - erase user data (and cache), then reboot
 *   --wipe_cache - wipe cache (but not user data), then reboot
 *   --set_encrypted_filesystem=on|off - enables / diasables encrypted fs
 *
 * After completing, we remove /cache/recovery/command and reboot.
 * Arguments may also be supplied in the bootloader control block (BCB).
 * These important scenarios must be safely restartable at any point:
 *
 * FACTORY RESET
 * 1. user selects "factory reset"
 * 2. main system writes "--wipe_data" to /cache/recovery/command
 * 3. main system reboots into recovery
 * 4. get_args() writes BCB with "boot-recovery" and "--wipe_data"
 *    -- after this, rebooting will restart the erase --
 * 5. erase_volume() reformats /data
 * 6. erase_volume() reformats /cache
 * 7. finish_recovery() erases BCB
 *    -- after this, rebooting will restart the main system --
 * 8. main() calls reboot() to boot main system
 *
 * OTA INSTALL
 * 1. main system downloads OTA package to /cache/some-filename.zip
 * 2. main system writes "--update_package=/cache/some-filename.zip"
 * 3. main system reboots into recovery
 * 4. get_args() writes BCB with "boot-recovery" and "--update_package=..."
 *    -- after this, rebooting will attempt to reinstall the update --
 * 5. install_package() attempts to install the update
 *    NOTE: the package install must itself be restartable from any point
 * 6. finish_recovery() erases BCB
 *    -- after this, rebooting will (try to) restart the main system --
 * 7. ** if install failed **
 *    7a. prompt_and_wait() shows an error icon and waits for the user
 *    7b; the user reboots (pulling the battery, etc) into the main system
 * 8. main() calls maybe_install_firmware_update()
 *    ** if the update contained radio/hboot firmware **:
 *    8a. m_i_f_u() writes BCB with "boot-recovery" and "--wipe_cache"
 *        -- after this, rebooting will reformat cache & restart main system --
 *    8b. m_i_f_u() writes firmware image into raw cache partition
 *    8c. m_i_f_u() writes BCB with "update-radio/hboot" and "--wipe_cache"
 *        -- after this, rebooting will attempt to reinstall firmware --
 *    8d. bootloader tries to flash firmware
 *    8e. bootloader writes BCB with "boot-recovery" (keeping "--wipe_cache")
 *        -- after this, rebooting will reformat cache & restart main system --
 *    8f. erase_volume() reformats /cache
 *    8g. finish_recovery() erases BCB
 *        -- after this, rebooting will (try to) restart the main system --
 * 9. main() calls reboot() to boot main system
 *
 * SECURE FILE SYSTEMS ENABLE/DISABLE
 * 1. user selects "enable encrypted file systems"
 * 2. main system writes "--set_encrypted_filesystems=on|off" to
 *    /cache/recovery/command
 * 3. main system reboots into recovery
 * 4. get_args() writes BCB with "boot-recovery" and
 *    "--set_encrypted_filesystems=on|off"
 *    -- after this, rebooting will restart the transition --
 * 5. read_encrypted_fs_info() retrieves encrypted file systems settings from /data
 *    Settings include: property to specify the Encrypted FS istatus and
 *    FS encryption key if enabled (not yet implemented)
 * 6. erase_volume() reformats /data
 * 7. erase_volume() reformats /cache
 * 8. restore_encrypted_fs_info() writes required encrypted file systems settings to /data
 *    Settings include: property to specify the Encrypted FS status and
 *    FS encryption key if enabled (not yet implemented)
 * 9. finish_recovery() erases BCB
 *    -- after this, rebooting will restart the main system --
 * 10. main() calls reboot() to boot main system
 */
前面也说过,RecoverySystem#installPackage(path)将"boot-recovery"写入BCB的command字段,重启之后进入Recovery进行升级。 那Recovery是从哪里拿到升级包的路径呢?
从注释中找到答案,Recovery服务通过/cache来和主系统交互(注释第一行)。执行RecoverySystem#installPackage(path)之后会将path路径写入*/cache/recovery/command*中(命令大概是这样:--update_package=[path]),然后Recovery服务读取到update package的命令之后就进行升级。 除了升级命令之外,常用的还有wipe data、wipe cache等命令,都是类似地将命令写入command文件中与Recovery服务交互。Android的设置中的恢复出厂设置其实就是写了一个wipe data命令到 command文件中,让Recovery服务启动时去重置数据。
另外,Recovery服务在读取到 /cache/recovery/command中的命令之后,还会将此命令写入到BCB控制块的recovery字段,主要是用来防止在升级等过程中突然断电,再次重启之后仍然能够进入Recovery,继续之前的升级功能。在升级等操作完成之后会清空BCB和/cache/recovery/command,避免下次重启之后仍然进入Recovery, 这些都是一些细节问题。
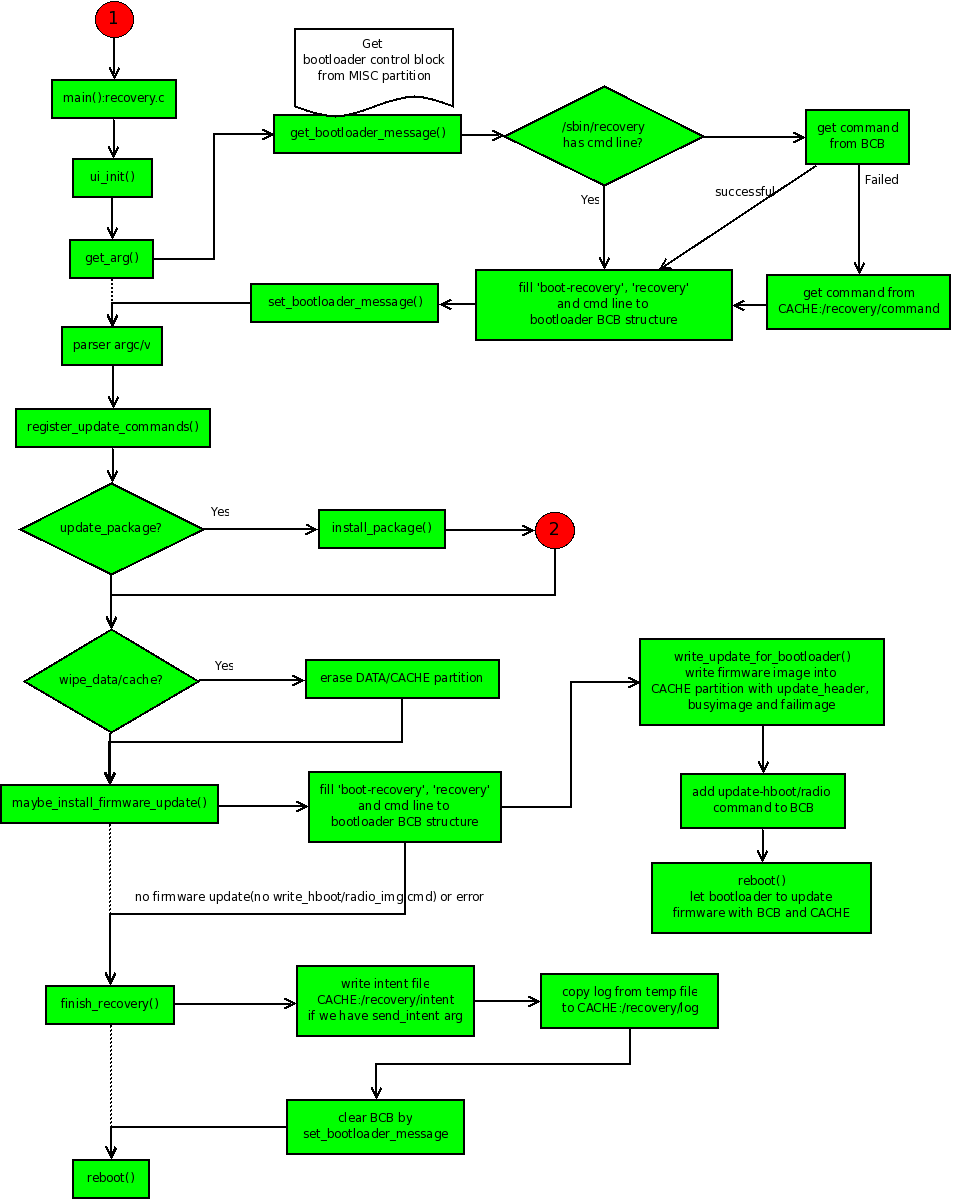
Recovery服务的具体流程可以看下面这张图:
总结
1、Recovery服务通过/cache来和主系统交互,Andorid系统一般是将命令写入/cache/recovery/command中来和Recovery服务进行交互。
2、Recovery服务能够做的功能有:工厂重置、OTA升级、安全文件系统的启用/禁用。
FastBoot模式(线刷)
Android启动除了正常模式和Recovery模式之外还有一个模式:FastBoot模式。
Recovery模式下的刷机通常称之为”卡刷“,因为升级包必须放在Android文件系统中,然后进行升级。FastBoot模式下的刷机称之为”线刷“,必须通过手机和电脑建立USB连接进行分区的烧录。在某些情况下,比如手机刷成砖头无法进入Recovery模式,可以进入fastboot模式通过线刷来恢复。
线刷一般也是通过组合按键进入,个人理解FastBoot模式是BootLoader程序的一部分,所以需要BootLoader支持。另外,也可以通过adb reboot bootloader进入FastBoot模式(如果成砖头了就只能组合按键进入了)。进入FastBoot模式之后,就可以通过在电脑端执行fastboot命令来将固件刷入到Android中。
fastboot devices
fastboot flash bootloader u-boot.bin
fastboot flash kernel uImage
fastboot flash system system.img
fastboot flash userdata userdata.img
fastboot flash ramdisk ramdisk-uboot.img
fastboot erase system #擦除system分区
fastboot erase cache #擦除cache分区
fastboot erase userdata #擦除userdata分区
fastboot reboot
...
总结一下
1、Android启动有三种情况:正常启动、进入Recovery模式、进入FastBoot模式。
2、通过组合键或者adb命令进入Recovery模式,可以进行工厂重置、OTA升级、安全文件系统的启用/禁用等功能,其中Recovery服务通过/cache跟主系统通信,还涉及到一个BCB的概念。这种方式称之为”卡刷“。
3、通过组合键或者adb命令进入FastBoot模式,通过与PC的连接进行固件烧录。这种方式称之为”线刷"。
参考资料
- http://www.cnblogs.com/bluestorm/p/3340894.html
- https://juejin.im/entry/57664abedf0eea0062f4dea8
- https://juejin.im/entry/57382e1f2e958a0069cc8eae